How To Create Compliant Photopolymer Braille
Learn How To Create ADA Compliant Photopolymer Braille
As most sign designers and fabricators are now aware, the 2010 ADA Standard for Accessible Design goes into effect on March 15, 2012. This has caused some buzz in the industry as everyone wants to ensure they are staying compliant and create Compliant Photopolymer Braille.
Back Story
The 2010 ADA Standard for Accessible Design will be the first major code change that the DOJ has published since the inception of the ADA in the early 1990’s and it reflects the 2004 ADAAG (ADA Accessibility Guideline) which has been the standard in the industry since it was published. Many states has since adopted the 2004 ADAAG into their state building codes. The 2010 Standard will bring continuity between the state and federal building codes.
The new 2011 ADA Standard does not have any language that is new or different from the 2004 ADAAG. There are however a few difference when compared to the original ADA such as sign mounting height and character kerning.
View and Download the 2010 ADA Standard for Accessible Design
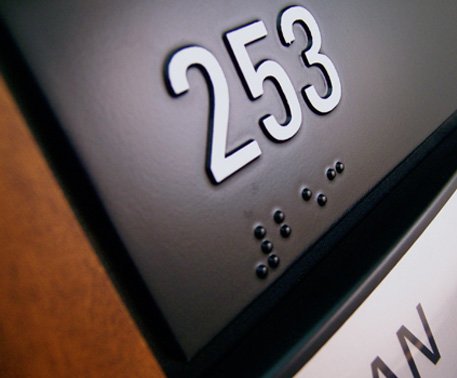
Photopolymer Braille
The 2004 ADAAG and now the 2010 ADA Standard does have a line of text which reads “Section 703.3.1 Dimensions and Capitalization. Braille dots shall have a domed or rounded shape and shall comply with Table 703.3.1″. This text has raised questions about photopolymer Braille since it was first introduced in 2004 ADAAG.

As stated, the code gives guidance on the shape of the Braille and is very specific in saying “shall have a domed or rounded shape.” We can achieve this with our photopolymer substrates making all NovAcryl products ADA Compliant when designed and fabricated properly.
Nova has developed specific guidelines and tools that allow for consistent processing of NovAcryl photopolymer substrates along with custom software that has all the specific code information embedded to ensure the signs are design and built properly.
The Process: How Compliant Photopolymer is Achieved
There are four main steps in creating a photopolymer sign – artwork design, film generation, photopolymer processing and finishing.
- We start by reducing the actual size of the Braille diameter in our Workflow Manager (WM) software. WM is designed to follow all the current ADA guidelines which include kerning, character size, Braille placement, fonts and more. The dot size is reduced to .044″ so that we can build a shoulder during the exposure process.
- Once the files are created a film negative needs to be generated with high enough density that allows for the proper exposure. Our InkStar Film Solution creates film with the proper density.
- The exposure of the photopolymer is measured using a 21 Step Stouffer Scale. This scale measures UV output which takes into account the wear on the bulbs ensuring proper exposure throughout the bulbs lifecycle. By using the scale we can accurately measure the exact size of the Braille.
- Once you have the proper dot size in the artwork and adequate exposure you will need to apply a top coat. This means a coating of paint for surface decorated signs or a clear coat for signs that are decorated sub-surface. We work very closely with Matthews Paint and per their specification you will need to apply a 4mil wet /2mil dry top coat on all photopolymer signs. This coating is the final step in creating complaint photopolymer Braille dots that “have a domed or rounded shape.”
Resources
- Watch a Video and How to Process Photopolymer
- Watch a Video on how to use the 21 Step Stouffer Scale
- View and Download the 2010 ADA Standard for Accessible Design
- Link to the DOJ ADA Home Page
Conclusion

There remains concern about the 2010 Standard and how it will ultimately impact everyone in the sign industry. The best way to stay out in front is to understand the codes, how they work and how the directly impact your business. Unfortunately there is a great deal of misinformation in the industry that relates to products and compliance.
Nova is an AIA Continuing Education Provider and offers a courseADA Requirements for Room Identification Sign.
Contact Us for more information and stay tuned for our upcoming series of webinars that will focus on the ADA Requirement.